TestMonitor
The TestMonitor integration lets you export your automated playbook results directly from JOSF into TestMonitor.
About TestMonitor
TestMonitor is a test management platform that helps teams plan, execute, and track their testing activities. By connecting JOSF to TestMonitor, your playbook run results are automatically submitted as test runs, giving your team full visibility into automated test outcomes without leaving TestMonitor.
Features
The TestMonitor integration supports:
- Exporting JOSF playbook results, along with their associated test cases and execution data, into TestMonitor.
- Identification of previously uploaded test cases, enabling you to submit multiple execution runs over time.
- Per-playlist control over which playlists are reported to TestMonitor.
- Automatic publishing of results from local runs, when enabled.
- Manual export of any playbook run to TestMonitor from the run overview.
Prerequisites
Before you begin, ensure you have:
- A JOSF Pro license (request access via hello@josf.io).
- JOSF version 3.3.4 or newer installed.
- Admin or project manager role in TestMonitor.
- The JOSF integration activated on the TestMonitor side (follow TestMonitor's JOSF integration guide to complete this step).
- Your TestMonitor integration token, you will find this on the integration settings page in TestMonitor after activating the JOSF integration.
When all these requirements are met, you can proceed with setting up the integration in JOSF.
Step 1 — Open the Integrations Page
Navigate to the Integrations configuration in JOSF as follows:
- Open your JOSF project.
- Go to Configuration in the main navigation.
- Select Integrations from the left-hand menu.
- In the integrations list, click on TestMonitor Reporting.
The TestMonitor integration card will appear in the main panel.
Step 2 — Enable the Integration
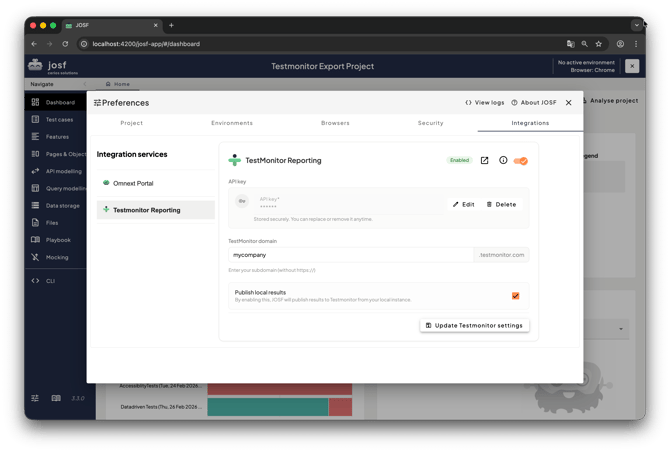
At the top of the TestMonitor Reporting card you will see a status badge (Enabled / Disabled) and a toggle switch.
- Flip the toggle switch in the top-right corner of the card to enable the integration.
- The status badge will change from Disabled to Enabled.
Once the integration is enabled, all configuration fields on the card become editable.
Step 3 — Enter Your API Key
JOSF uses an API key (your TestMonitor integration token) to authenticate with TestMonitor.
- In the API key section of the integration card, click Add API key.
- Paste the integration token you copied from TestMonitor's integration settings page.
- Click Save.
The key is stored securely in an encrypted keystore within your JOSF project. You can replace or remove it at any time by clicking Edit or Delete.
Step 4 — Configure Your TestMonitor Domain
Tell JOSF which TestMonitor instance to connect to:
- In the TestMonitor domain field, enter your subdomain. For example, if your TestMonitor URL is <https://mycompany.testmonitor.com> type mycompany.
- The suffix .testmonitor.com is appended automatically.
Only lowercase letters, numbers, and hyphens are accepted.
Step 5 — Configure Local Publishing (Optional)
By default, JOSF only exports results when runs are executed through the CLI (e.g. in a CI/CD pipeline). If you also want results from local (desktop) runs to be published automatically:
- Check the Publish local results checkbox in the settings row.
When enabled, JOSF will automatically export playbook results to TestMonitor after every local run but only for playlists that have TestMonitor reporting turned on (see Step 7).
Step 6 — Save Your Settings
After configuring the domain and publish-local preference: Click Update Testmonitor settings at the bottom of to save your changes.
Step 7 — Enable Reporting per Playlist
The integration does not automatically report every playlist. You choose which playlists are included:
- Open a Playbook from the Playbook overview.
- Select the Playlist you want to report on.
- At the top of the playlist configuration, you will see a TestMonitor Reporting toolbar with a toggle switch.
- Flip the toggle to on for each playlist whose results should be exported to TestMonitor.
- Save the playbook.
Only playlists with TestMonitor Reporting enabled will have their results submitted when a playbook run completes.
Exporting Results
Automatic export (CLI / CI pipeline)
When a playbook run finishes via the CLI runner and the integration is active, JOSF automatically checks whether any playlists are configured for TestMonitor reporting. If so, the results are exported without any manual action.
Automatic export (local runs)
If you enabled Publish local results in Step 5, JOSF will also automatically export results after every local run again, only for playlists that have TestMonitor reporting enabled.
Manual export
You can also export any previous run manually:
- Open the Playbook and navigate to the Runs
- Open the run you want to export.
- Click the Export run button in the toolbar.
- Select Export to TestMonitor from the dropdown menu.
- A dialog will appear showing the export progress. Once completed, you can click Open report to view the results directly in TestMonitor.
After a run has been exported, the menu option changes to Open TestMonitor export, which takes you straight to the submitted test run in TestMonitor.
View Results in TestMonitor
Once the results have been submitted, JOSF generates a direct link to the test run in TestMonitor. You can access it in two ways:
- Click Open report in the export-complete dialog immediately after exporting.
- Open a previously exported run and select Open TestMonitor export from the Export run menu.
From TestMonitor, you can review all submitted runs by filtering on the JOSF reporter in the Track section.
Deactivate the Integration
If the integration is no longer required:
- Go to Configuration → Integrations → TestMonitor Reporting.
- Flip the toggle switch at the top of the card to off.
- The status badge will change to Disabled.
Deactivating the integration will halt the submission of any future results. All previously exported test runs and results remain accessible in TestMonitor.
You can optionally remove the stored API key by clicking Delete in the API key section.
Troubleshooting
If you encounter errors with the TestMonitor integration, follow these steps:
Confirm your domain and API key are correct
Verify that the subdomain in JOSF matches your TestMonitor instance (e.g. mycompany for mycompany.testmonitor.com) and that the API key matches the integration token shown on your TestMonitor integration settings page.
Ensure the integration is enabled on both sides
The integration must be activated in both TestMonitor (via Project Settings → Integrations) and JOSF (via Configuration → Integrations → TestMonitor Reporting). If either side is disabled, results will not be submitted.
Check that playlists are opted in
Results are only exported for playlists that have the TestMonitor Reporting toggle enabled. Open your playbook, select the playlist, and verify the toggle is on.
Check your daily submission quota
Ensure you have not exceeded your TestMonitor daily submission quota. Submission limits are based on your TestMonitor subscription plan: Starter permits up to 500 results per day, Professional up to 2,500, and Enterprise up to 5,000. Additionally, a maximum of 10 submissions per minute is allowed.
Refresh your integration token
If you continue to experience authentication errors, refresh the token in TestMonitor and update it in JOSF:
- In TestMonitor, open the JOSF integration panel and select Refresh token… from the three-dotted menu.
- Copy the new token.
- In JOSF, go to Configuration → Integrations → TestMonitor Reporting.
- Click Edit in the API key section, paste the new token, and click Save.
Contact support
If these solutions do not resolve your issue, feel free to reach out to the JOSF support team at hello@josf.io or the TestMonitor support team for additional assistance.